Should you use posts or pages? Deciding between pages and posts when creating content for your WordPress website can be tricky, especially since they may seem similar at first. However, understanding the key differences between the two can save you time when creating content. It's crucial to use the correct structure for your content, as each comes with specific features and functionalities suited for particular purposes.
What’s the Difference Between a Page and a Post?
WordPress offers two primary types of content by default: pages and posts.
- Page: Choose a page if you need to create static or informational content that remains unchanged. Pages are typically used for content such as contact forms, galleries, or company details. Examples include the About or Contact Us pages of a website.
- Post: If you want to create dynamic content such as blog posts, announcements, or news updates, use a post. Posts are usually displayed in reverse chronological order, with the newest content appearing at the top of the list.
This article will cover how to create and manage pages and posts, highlighting the similarities and key differences in their functions.
Creating a New Page or Post
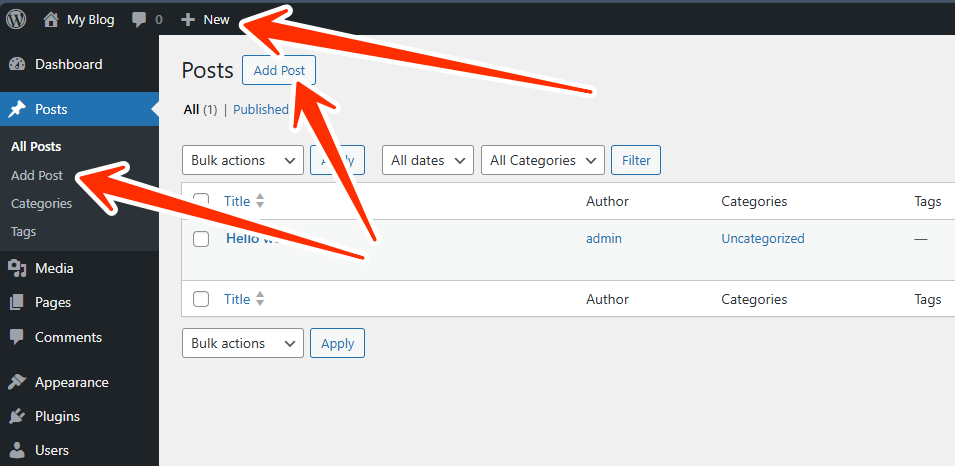
To create a new page or post:
1. Log in to your WordPress Dashboard.
2. In the left-hand menu, hover over either "Pages" or "Posts.
Alternatively, click the '+ New' button located in the header and choose either "Page" or "Post."
Adding Title and Content
Both the title and content of your page or post are crucial for your site's SEO performance.
To add a title and content:
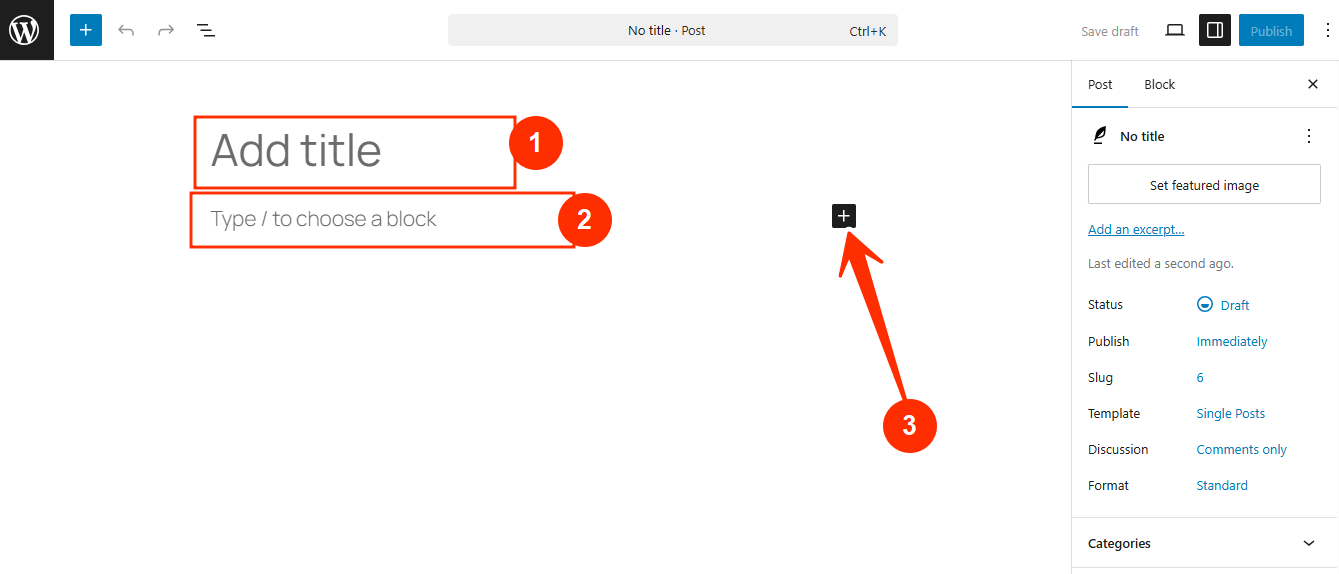
1. Enter the title of your post at the top of the page.
2. Directly below the title, you can add content using blocks. If you're starting with text, just begin typing.
3. To add additional blocks, click on the + (Inserter), to Add Title and Type / to choose a block.
Blocks are available for different content types, including Columns, Headings, and Paragraphs. You can also use widgets in blocks, such as Search or Recent Comments. Blocks for embedding third-party content are also available. For more editing options, click the cog icon in the top-right corner and select the Block tab.
Adding Images, Videos, & Other Media
There are two primary block options for media: the Image block for single uploads and the Gallery block for multiple images.
To add media:
- Option 1: Drag and drop files directly from your computer into the desired block (e.g., Image block).
- If you want to place text next to an image, use the Media & Text block to wrap text around the image.
- Option 2: You can upload images into an Image block by selecting files from your Media Library or uploading new ones.
- Option 3: Alternatively, go to the Dashboard, click "Media" from the left-hand menu, then "Add New," and select your files.
To edit images, videos, or galleries:
- Select the media block in your post or page. The format toolbar will appear at the top of the block.
- For more editing options, visit the Block tab on the right-hand side of the page.
Adding a Featured Image
A featured image is the visual element that appears in search engine results or when sharing your content on social media. It plays a crucial role in attracting visitors, improving SEO, and enhancing the value of your content.
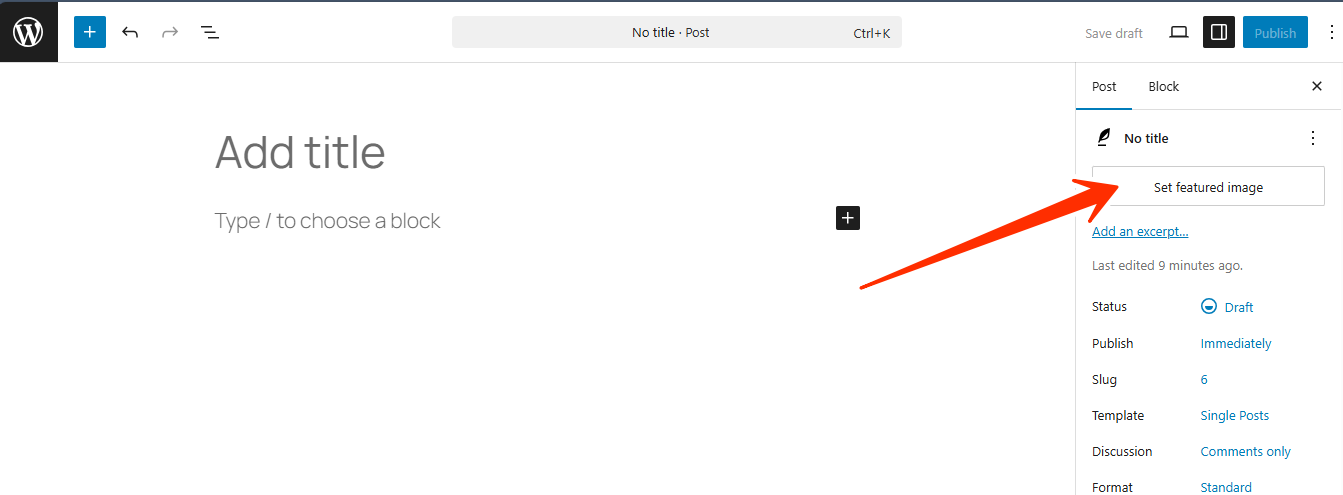
To set a featured image:
1. Choose the page or post where you want to add the image.
2. Scroll down to the sidebar and find the "Featured Image" section.
3. Click "Set Featured Image" to access the Media Library, where you can select an existing image or upload a new one.
Page or Post Tab Settings
You can access more settings from the right-hand sidebar. Here’s an overview of the options you'll find when you click on the Page or Post tabs.
1. Status and Visibility
You can adjust who can view your content by changing the Visibility setting under the Post tab. Click the "Public" link next to Visibility under Status & Visibility.
- Public – Visible to everyone and emailed to your followers.
- Private – Visible only to blog Editors and Administrators. Private posts will not appear in feeds or search results, and they won’t be emailed to followers.
Once you’ve updated the visibility settings, make sure to click "Update" or "Publish" to apply your changes.
2. Changing Post URL Slug or Permalinks
Permalinks (or URL slugs) are the URLs that appear after your domain name and are automatically generated based on your post’s title. You can modify these under the Permalink settings in the Post tab.
3. Adding Categories and Tags
The Block Editor allows you to categorize and tag posts, making it easier for readers to find relevant content. Categories and tags can be managed in the Post tab on the right sidebar.
4. Adding Excerpts
Sometimes the title and featured image alone aren’t enough to grab attention. An excerpt provides a preview or teaser to encourage readers to click through. To add an excerpt, click the cog icon, locate the Excerpt section under the Post tab, and write your text there.
5. Choosing the Author
You can change the author of a post and assign it to someone else. This option is available under the Status and Visibility section in the Post tab.
6. Turning Comments On or Off
The Block Editor includes a commenting system, allowing users to leave feedback on your blog posts. You can disable comments for individual posts from the Discussion section under the Post tab.
Customizing a Post
Once you've created a blog post, there are several features you can use to customize and manage your content further. These options are located under the "Posts" section in the left-hand menu of the WordPress dashboard.
- All Posts: This section shows a list of all posts created on your website. You can see the title, author, assigned categories, tags, comments, and the date published or last modified. You can customize what details are shown by clicking on the "Screen Options" button in the upper right corner.
- Add New: Use this option to create a new post.
- Categories: Categories allow you to organize your posts. You can create new categories, customize their URL, and even create subcategories (child categories) beneath a main category. For example, the main category "Houses" could have subcategories like "Cabins," "Apartments," and "Mobile Homes." Posts can be assigned to multiple categories.
- Tags: Tags are more specific than categories and focus on particular topics within a post. For example, you might tag a post about movies with "Drama" or "Academy Award Winning" to highlight the content’s key themes. Tags help with organizing content and making it easier for readers to find what they're looking for.
Pages or Posts?
Depending on your website’s needs, you might use both pages and posts, each serving different functions.
- Pages: Pages are used for static content that doesn’t change often, like your Terms and Conditions, About Us, and Contact Us pages. These are usually included in your website's main navigation menu for easy access.
- Posts: Posts are dynamic pieces of content that make up a blog. They are displayed in reverse chronological order, with the newest post at the top. Blogs serve as a collection of ongoing updates or journal entries.
Key Differences Between Pages and Posts
Here’s a summary of how pages and posts differ:
How often can you update them?
Pages are typically updated infrequently. They are considered timeless content. Posts, on the other hand, are updated regularly with new content, making them timely.
Details like publication date and author?
Pages do not display their publication date or author because they are intended to be static content. Posts, however, can include details such as the author's name and the date they were published.
How do you organize content?
Pages don’t use categories by default, but you can organize them hierarchically with parent and subpages. Posts can be organized with categories and tags, which makes it easier for readers to find specific content.
Social media sharing?
Pages are typically not shared on social media (e.g., Terms and Conditions or About pages). Posts, however, are shareable on social media, helping increase traffic to your site. Social media buttons can be added to make sharing easier.
Remember to regularly back up your WordPress website. LyteHosting's professional service, CodeGuard, can help you create daily automatic backups and will alert you if any suspicious changes occur on your site.


